XMP 3.0 is the third iteration of Intel’s Extreme Memory Profile. In a nutshell, XMP is an automated overclocking technology that allows for higher than standard memory speeds utilizing customized RAM setting profiles. These predefined XMP profiles go beyond the JEDEC standard settings you normally see by default. They are pre-configured to an overclocked frequency value and timings that are tested to be stable for better system performance. XMP also removes the need for manually tinkering with memory frequency, timings, or voltage to enjoy faster speeds.
XMP 3.0 was developed and co-released with the DDR5 SDRAM standard. The basic method of use remains the same, although this time we are now introduced to other perks that enhance the customizability experience.
How XMP 3.0 Works
Using XMP 3.0 and enabling its function is essentially no different from previous versions. Simply put, when you choose an XMP setting (in the BIOS), the memory module is automatically boosted to a specific higher performance value. So long as the motherboard supports XMP and a particular memory frequency range (of the CPU), you are more or less sure that your RAM configuration is always well-optimized. In addition, two major features provide an update on its overall usability range:
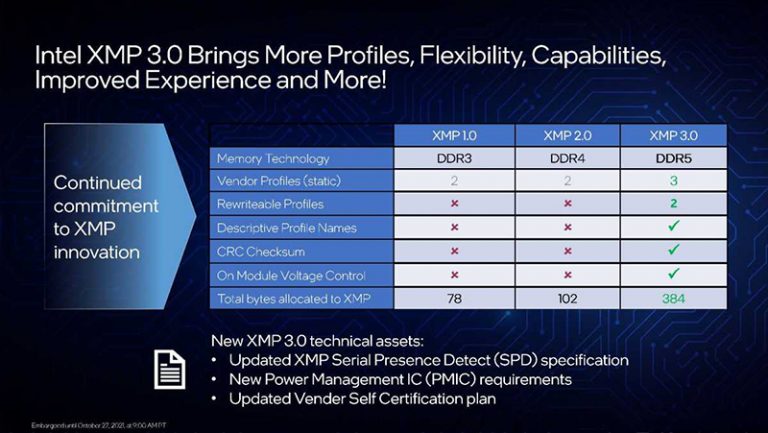
Even More Profiles
Previously, XMP has allowed the use of up to two vendor-issued saved RAM profiles for a particular memory module. XMP 3.0 bumps this to three, opening more customized variations to suit the performance or efficiency needs of certain users. Not all builds require the highest of clock frequencies or the lowest of CAS latencies. It’s all about optimization and stability.
In addition to three vendor profiles. XMP 3.0 also adds two additional “free slots” for customized profiles of the users themselves. This option is, of course, only for those who want even higher granular freedom in setting automatic profiles. Mix, match, test… and rename! Then on your next build, you may simply turn on your personally saved XMP 3.0 profile for instant use.
Dynamic Memory Boost
Similar to how CPUs today automatically scale their performance through variable core frequency boosting, Intel’s Dynamic Memory Boosts introduces a way for your memory modules to switch memory profiles on demand.
When a Dynamic Memory Boost-enabled system detects a particular application that could benefit from higher XMP profiles, the CPUs memory controller would switch your memory modules’ standard JEDEC-rated speeds to an XMP profile that suits the particular workload. Then, if the application is closed, or the task is completed, it would automatically “downclock” back again to its regular memory profile.
Do I Need (to Enable) XMP?
If available (and it usually should be for most modern systems), there’s definitely no reason for you not to enable a proper XMP profile for your memory modules.
First of all, it’s a free, almost one-button method of immediately boosting your RAM sticks to its utmost performance maximum. Except for creating custom profiles on XMP 3.0’s “free slots”, you don’t have to waste time anymore on tweaking voltage values, or incrementally increasing memory multipliers until you get just below instability.
Second, it’s absolutely safe to use. They’re vendor-tested customized RAM configurations, after all. Manufacturers and distributors wouldn’t have advertised it by default if you still have to troubleshoot afterward. Just be sure to do your own research about the memory limitations of the CPU itself, of course.
And lastly, you’re more or less certain that no wild crashes or unbootable scenarios would occur with a configured XMP profile. It’s become pretty much a set-and-forget thing even for the non-tech-savvy.
XMP Profiles and How to Use Them
Step one, open the memory config menu of your motherboard in the BIOS. This is dependent on the board manufacturer so you may have to refer to the product manual for this. Next, make sure that XMP is enabled. Lastly, choose a memory configuration from the drop-down list within each DIMM slot’s information line.
And that’s about it. Again, the typical option is to go for the highest clock frequency and lowest CAS latency, but the user’s mileage may vary. Choose what you think might be the best for your use case.
Final Thoughts
XMP 3.0 is the first major update of the technology standard since its widespread adoption last 2007. And if you think about how it works, there really wasn’t any need to make drastic changes on what it could offer or how it should even be used.
Today, with DDR5 (and AMD’s recent attitude towards memory tweaking) shaking things up with very tangible physical changes to the technology, the possibilities are once again extended just a bit further.
Though, we’d really love it if there’s a way for XMP (3.0) to just be enabled by default instantly, the moment you insert your memory sticks into the DIMM slots.